Learning how to make shorts is a valuable skill for anyone interested in fashion, sewing, or sustainable clothing. Whether you’re upcycling old jeans or creating custom summer wear from fabric, this hands-on craft offers both creativity and practicality. Making your own shorts allows you to control the fit, style, and materials used. As a result, you get a unique piece that matches your body and taste perfectly.
Moreover, knowing how to make shorts reduces reliance on fast fashion. You can repair, resize, or redesign existing garments instead of buying new ones. This saves money and supports eco-friendly habits. From denim cutoffs to tailored linen styles, there are endless variations to explore. This guide walks you through every stage—from choosing fabric to finishing seams—so you can confidently start your project.
 Choosing the Right Fabric for Your Shorts
The fabric you pick shapes the final look and comfort of your shorts. Cotton is a top choice because it’s soft, breathable, and easy to sew. It works well for casual styles like jean shorts or relaxed-fit chinos.
Denim remains popular for its durability and classic appeal. Medium-weight denim holds shape without being too stiff. Lighter versions offer more flexibility for warm weather.
Linen suits hot climates due to its natural cooling properties. It wrinkles easily, but this adds to its laid-back charm. Blends with cotton improve wrinkle resistance while keeping breathability.
Stretch fabrics like jersey or spandex blends enhance movement. They’re ideal for athletic or bike-style shorts. These materials hug the body and recover well after wear.
Lightweight twill or corduroy gives structure with texture. Twill resists fading and wears well over time. Corduroy adds warmth and visual interest, especially in cooler months.
Matching Material to Style and Season
Your intended use should guide fabric selection. For summer, choose lightweight, moisture-wicking textiles. Linen, cotton voile, or rayon keep you cool under the sun.
Winter or transitional seasons call for heavier weaves. Flannel-lined denim or brushed cotton provides extra warmth. Layer them with tights or leggings if needed.
Active wear demands stretch and recovery. Knits with 2–5% spandex move with your body. They prevent restriction during walking or cycling.
Formal shorts require crisp finishes. Tailored wool blends or structured cotton work best. These hold pleats and darts cleanly.
Children’s shorts need durability and ease of care. Pre-shrunk cotton withstands frequent washing. Avoid delicate silks or slippery satins for playtime.
Always pre-wash fabric before cutting. This prevents shrinkage later. Dry and press it to mimic post-wear conditions.
 Measuring and Taking Accurate Body Dimensions
Accurate measurements ensure your shorts fit comfortably. Start with waist size. Wrap a soft tape around the narrowest part above the hips. Keep it snug but not tight.
Next, measure the hips. Circle the fullest part, usually at hip bone level. Stand straight and breathe normally during this step.
Inseam length runs from crotch to desired leg opening. Decide how short you want the shorts. Common lengths are 3”, 5”, or 7” for men and women.
Outseam includes waist to hem. This helps determine overall length. Combine it with rise—the distance from crotch to waistband—for full pattern accuracy.
Thigh circumference affects mobility. Measure around the thickest part of the upper leg. Add 1–2 inches for ease, especially in non-stretch fabrics.
Creating a Personal Fit Chart
Record all numbers clearly. Label each measurement with dates. Bodies change over time, so updates matter.
Compare your stats to commercial patterns. Most brands offer size charts online. Find one close to your dimensions as a starting point.
Make a mock-up using cheap fabric. Muslin or old sheets work well. Sew a test pair to check fit before cutting good material.
Adjust darts, seams, or waistbands based on the trial. Pin changes directly onto the mock version. Transfer these edits to your final pattern.
Consider posture and movement. Sit down in the mock-up. Check for pulling or binding. Good shorts allow bending and walking freely.
Keep the adjusted pattern for future projects. Trace it onto paper or cardstock. Save time by reusing proven templates.
Selecting and Using the Right Tools and Equipment
Having proper tools makes learning how to make shorts easier. A sewing machine is essential for strong, even stitches. Use a universal needle size 80/12 for medium fabrics.
Scissors matter too. Invest in sharp fabric shears for clean cuts. Never use them on paper—they dull quickly. Keep a smaller pair for threads.
Pins and clips hold layers together. Glass-head pins resist heat from irons. Wonder Clips work better for thick seams or knits.
A seam ripper fixes mistakes without damaging cloth. Always cut threads close to knots. Pull gently to avoid snags.
Measuring tools include rulers, tapes, and French curves. Clear quilting rulers help with straight edges. Curved templates shape pockets and fly fronts.
Setting Up Your Workspace for Success
Organize your area before starting. Clear a large table or desk near an outlet. Ensure good lighting—natural light is best, but add a lamp if needed.
Arrange supplies within reach. Keep thread, needles, and bobbins nearby. Store heavy items like fabric bolts off the floor.
Use a dedicated cutting mat if possible. Protect surfaces and maintain precision. Rotary cutters glide smoothly over self-healing mats.
Label containers for small parts. Buttons, zippers, and elastic go in separate boxes. This avoids confusion mid-project.
Keep a notebook for notes and sketches. Record adjustments, stitch settings, or design ideas. Future projects will benefit from this log.
Minimize distractions. Turn off notifications and set a timer. Focused sessions lead to better results and faster progress.
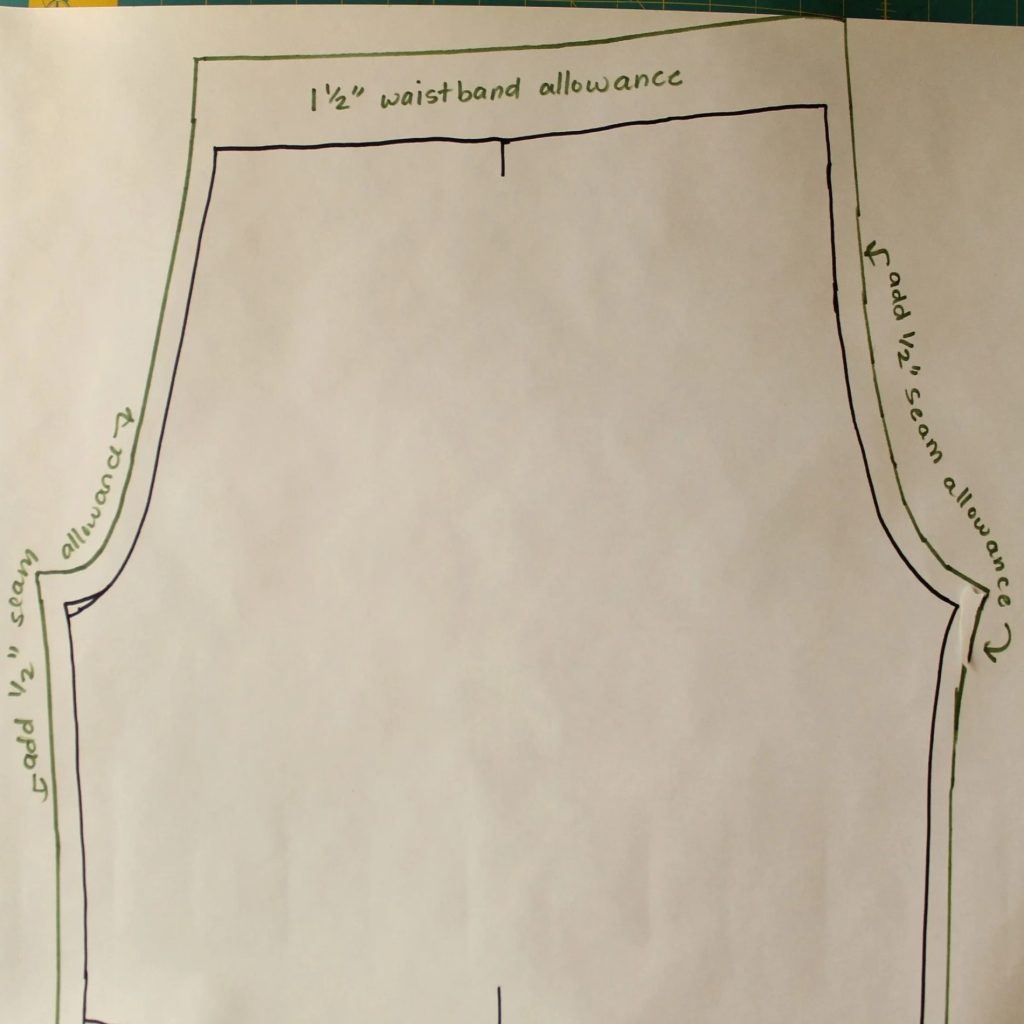
 Cutting Fabric According to Pattern Layout
Lay your fabric flat on a clean surface. Smooth out wrinkles with your hands. Fold it wrong side up if the pattern requires double layers.
Pin or weigh down the pattern pieces. Prevent shifting during cutting. Follow grainline arrows to align with fabric selvage.
Cut slowly and steadily. Let the scissors do the work. Rushing causes jagged edges or misshapen curves.
Transfer markings using tailor’s chalk or washable pens. Mark darts, notches, and pocket placements. These guides ensure accurate assembly.
Save scraps for patches or embellishments. Small pieces can trim collars or reinforce stress points. Nothing goes to waste.
Handling Different Fabric Types with Care
Each material behaves differently when cut. Slippery fabrics like satin need extra pinning. Spray adhesive stabilizes layers temporarily.
Fuzzy materials such as fleece shed fibers. Cut on a dark surface to see edges clearly. Avoid fraying by sealing raw edges early.
Plaids and stripes require matching at seams. Align patterns across front and back panels. This creates a professional finish.
Napped fabrics like velvet must all face one direction. Reversing causes color shifts. Double-check orientation before cutting.
Knits stretch easily. Support them fully while cutting. Don’t let fabric hang over table edges.
Pre-cut fusible interfacing if needed. Apply it to waistbands or fly shields. This adds stiffness where structure matters.
Sewing Techniques for Strong and Clean Seams
Start with a straight stitch for most seams. Set stitch length between 2.5–3mm. Backstitch at beginning and end to lock threads.
Use a zigzag or stretch stitch for knits. This allows fabric to flex without breaking. Overlockers (sergers) give neat, durable edges.
Press seams open or to one side. Heat sets stitches and flattens bulk. Use steam carefully on delicate fabrics.
Topstitching adds strength and style. Stitch 1/4 inch from edge for visible lines. Match thread color or contrast for effect.
Reinforce high-stress areas. Double-stitch crotch curves and pocket corners. Bar tacks secure belt loops and plackets.
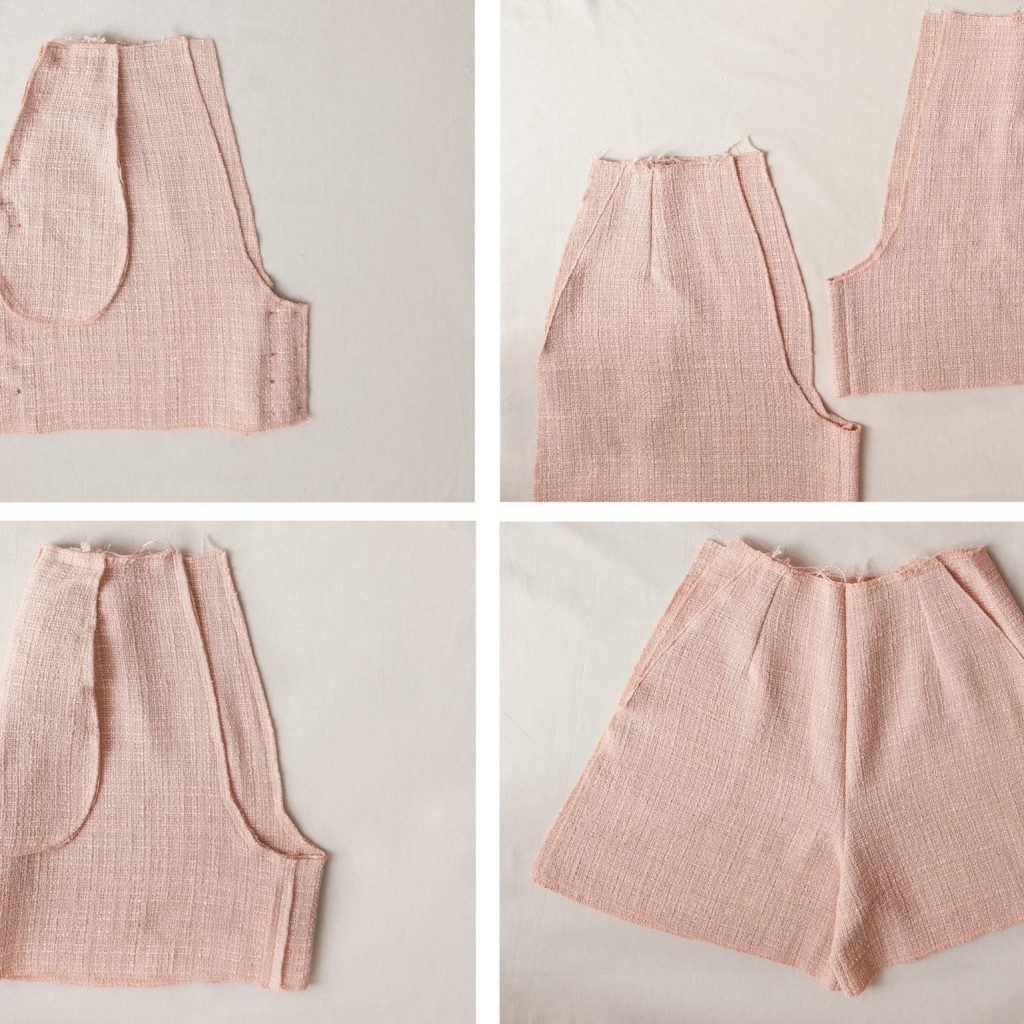
Assembling Key Components Step by Step
Begin with pockets. Attach patch or inset types first. Follow pattern instructions closely. Misaligned pockets ruin symmetry.
Join front and back panels at side seams. Pin crotch curves carefully. Ease fabric gradually to avoid puckers.
Insert zippers smoothly. Use a zipper foot for narrow clearance. Bury teeth under placket fabric for clean look.
Attach waistband last. Match notches and distribute fullness evenly. Sew securely and fold down for crisp finish.
Add closures like buttons or hooks. Mark placement precisely. Reinforce holes with bartacks or hand stitching.
Finish hems neatly. Fold twice for enclosed raw edge. Blind hem stitches disappear on outer fabric.
 Customizing Your Shorts for Unique Style
Personal touches make handmade shorts stand out. Try contrasting topstitching in bright colors. Yellow or red thread pops on denim.
Add patches or embroidery. Appliqué logos, flowers, or initials. Hand-stitched details show craftsmanship.
Roll cuffs for a casual vibe. Secure with topstitching or leave loose. Cuff width changes silhouette dramatically.
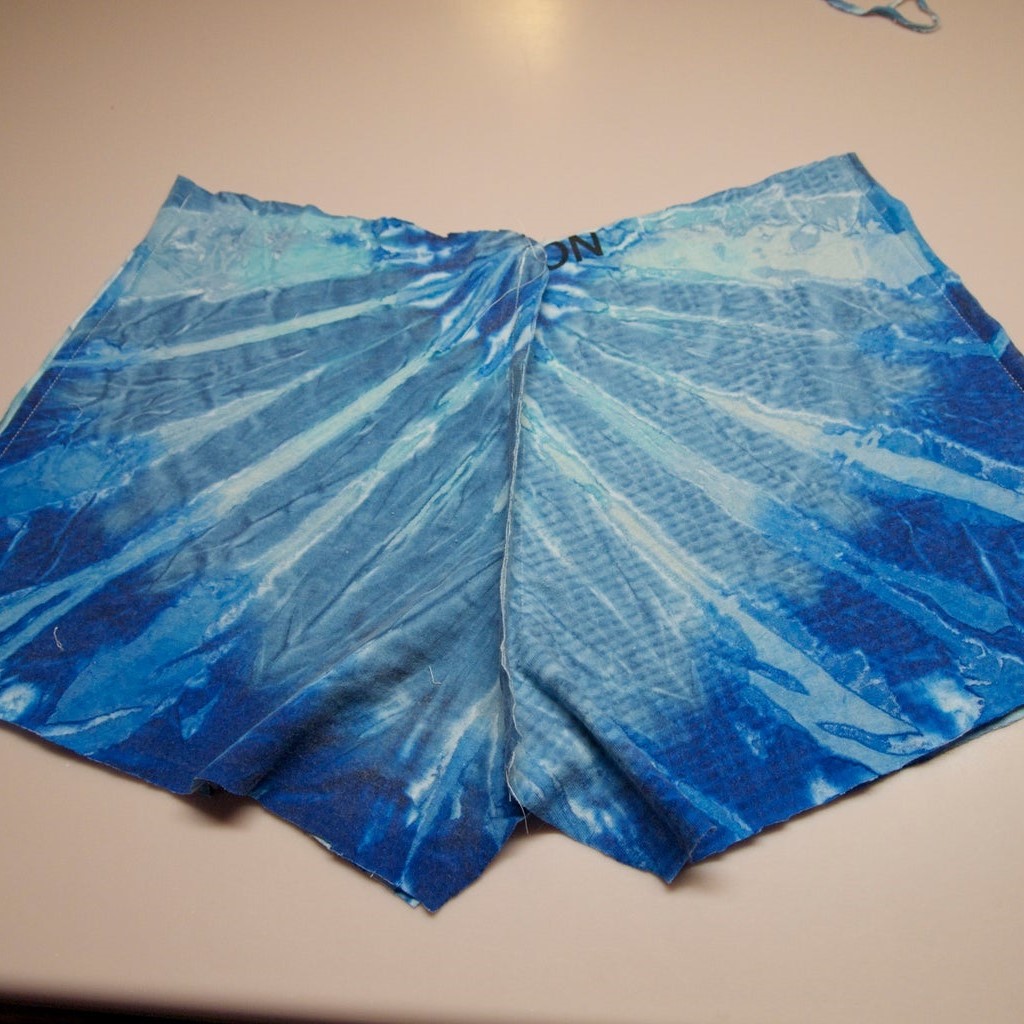
Dye or bleach for ombre effects. Dip legs in dye baths gradually. Use rubber bands for tie-dye patterns.
Distress denim intentionally. Sandpaper edges or clip tiny holes. Wash afterward to soften frayed areas.
Exploring Popular Short Styles You Can Make
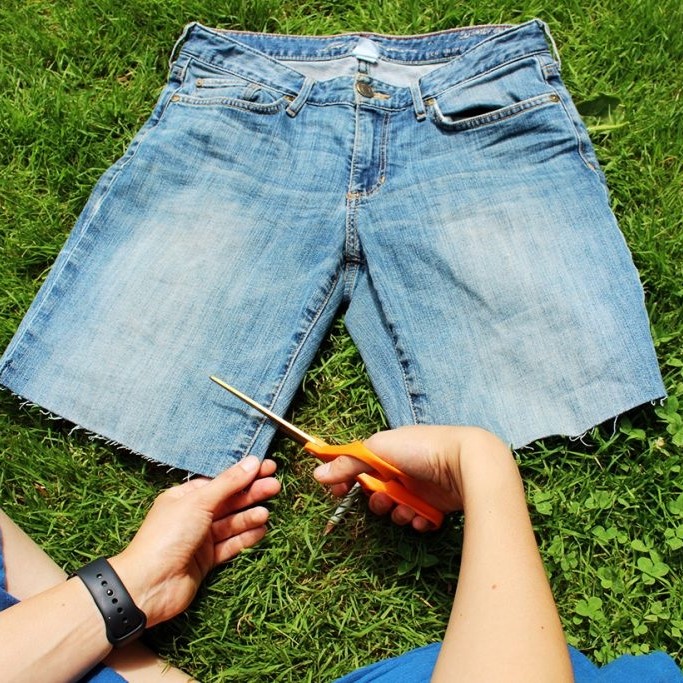
Denim cutoffs are simple for beginners. Use old jeans and trim to length. Raw hems fray naturally over time.
Cargo shorts carry utility vibes. Include multiple pockets and wide legs. Great for hiking or urban exploration.
Tailored shorts resemble dress pants. Flat fronts, pleats, and belt loops elevate style. Wear them with blazers or polos.
Athletic bike shorts use stretch fabric. High spandex content hugs the body. Ideal for workouts or lounging.
High-waisted retro styles flatter many figures. Emphasize the waist and elongate legs. Pair with crop tops or tucked shirts.
Relaxed boyfriend cuts offer comfort. Slightly oversized fits suit casual outings. Roll waists for adjustable height.
Frequently Asked Questions About How to Make Shorts
Can I make shorts without a sewing machine?
Yes. Hand sewing works with strong thread and small stitches. It takes longer but is portable and quiet.
What if I don’t have a pattern?
Trace a favorite pair of shorts onto paper. Add seam allowances later. This creates a custom template.
How much fabric do I need?
Typically 1–1.5 yards, depending on size and style. Wider fabrics reduce yardage needs.
Do I need to pre-wash fabric?
Yes. Washing prevents shrinkage after sewing. Dry and press before cutting.
Can I turn long pants into shorts?
Absolutely. Jeans, chinos, or trousers adapt easily. Trim and finish hems cleanly.
Which stitch is best for stretch fabric?
Use a narrow zigzag or lightning bolt stitch. It mimics elasticity and prevents breakage.
Where can I find free patterns?
Many websites offer downloadable PDFs. Search “free shorts sewing pattern” for options.
 Final Thoughts on Mastering How to Make Shorts
Knowing how to make shorts opens doors to personal expression and sustainable fashion. It empowers you to create clothes that fit perfectly and reflect your style. From selecting fabric to adding final stitches, each step builds confidence and skill.
Whether you’re mending old favorites or designing from scratch, the process teaches patience and precision. Most importantly, handmade shorts carry pride and purpose. So gather your tools, follow the steps, and enjoy the journey. With practice, learning how to make shorts becomes second nature—and a rewarding lifelong skill.